Calibration
Calibration teaches SmartSpin2k how far your resistance knob can turn. Run it once after setup, and SmartSpin2k uses that range on every ride.
Optional
What calibration does
SmartSpin2k turns the knob to the lowest and highest resistance your bike allows and saves that range. After that, it finds its place on its own each time it powers on. The motor stays inside your bike's limits, and the Power Table it learns in ERG mode is saved between rides.
Two ways to start it: the Calibrate Trainer screen in the Companion App, which walks you through it, or the Calibrate or Spin Down button in your training app.
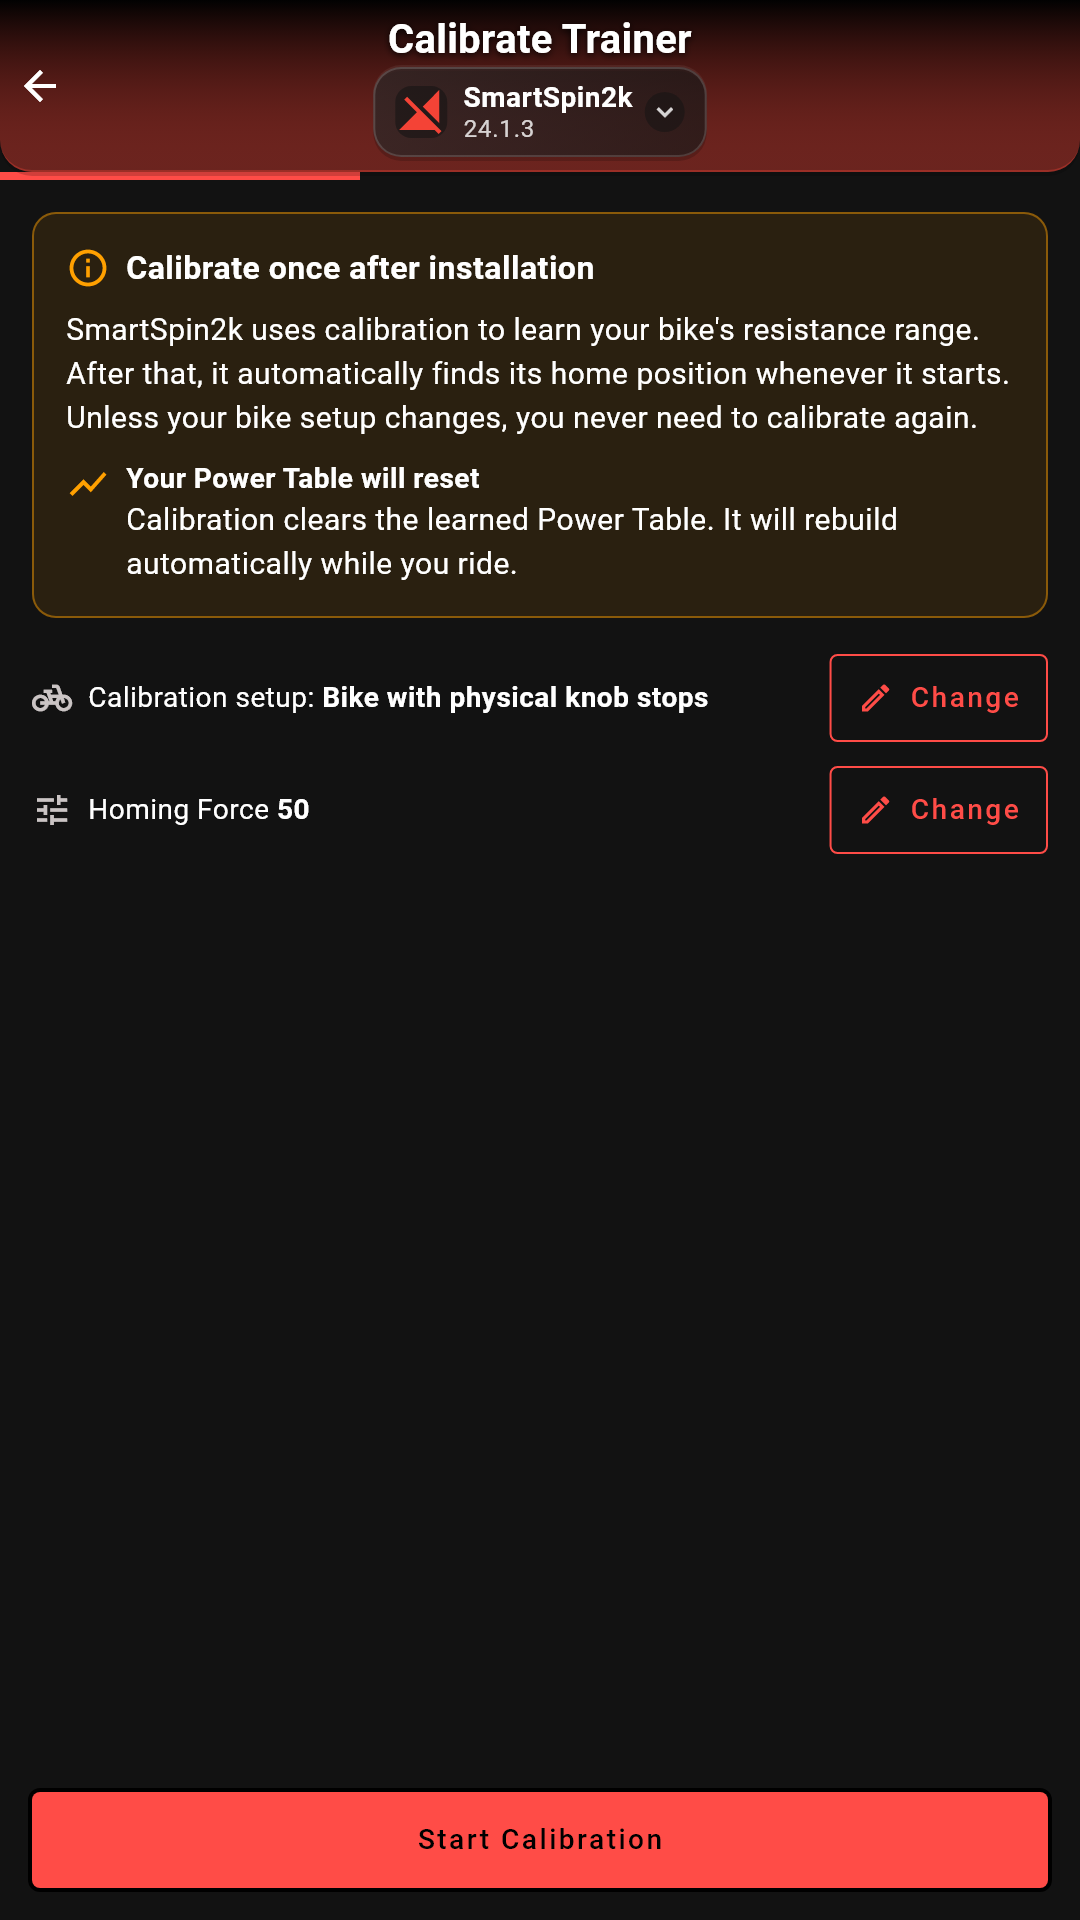
Table of contents
- Do you need it?
- Before you start
- Calibrate
- What SmartSpin2k is doing
- Every ride after calibration
- When to calibrate again
- Stop or fix a calibration
- Turn calibration off
Do you need it?
No. SmartSpin2k rides fine without calibration. Here is what changes when you run it.
- SmartSpin2k keeps the knob inside a safe range based on default limits.
- ERG mode learns your bike during each ride, and starts over the next time.
- Nothing extra happens when you power on.
- SmartSpin2k knows your knob’s real low and high limits.
- The Power Table ERG mode learns is saved and reused on later rides.
- Each time it powers on, SmartSpin2k finds its starting point on its own. See Every ride after calibration.
What a saved Power Table changes
ERG mode steers by the Power Table, a map of how much power each knob position takes at each cadence. Until the table has enough readings near your target, SmartSpin2k finds the right resistance by trial and correction. Once it trusts the table, it moves the knob straight to the right spot when the target changes.
The chart shows two real rides on the same bike. On the first, a saved table loaded at power-on, and ERG trusted it 36 seconds into the workout. On the second, the table started empty. It took 11 minutes to reach that point, and by the end of the ride the table had 181 readings, compared with 315 on the first ride.

Without calibration, every ride starts like the second one.
Peloton Bike+ with power meter pedals only: skip calibration. The Bike+ knob has no stops, so SmartSpin2k needs the resistance that Grupetto sends to calibrate. With Grupetto set up, calibration works. See the Peloton Bike+ with Grupetto tab under What SmartSpin2k is doing.
Before you start
- Finish Set Up Your Bike. Power and cadence must show in the Companion App (Part 5). SmartSpin2k won’t start until it sees you pedaling.
- Peloton Bike in Tablet Mode: start a Just Ride on the tablet first, so the bike sends cadence.
- Peloton Bike+: open Grupetto on the bike’s tablet with BLE TX on, and keep it open the whole time.
- Calibration clears the learned Power Table. It rebuilds as you ride.
- Keep your hands off the shifter. A shift cancels calibration.
Calibrate
-
The Companion App shows each stage as it happens and tells you what to do if something goes wrong.
- On the Device screen, tap Maintenance, then Calibrate Trainer.
- The first time, the app asks Are you using a Peloton Bike+? Tap No if your knob stops at low and high resistance. Tap Yes, Bike+ for a Bike+. The app remembers your answer. Tap Change to fix it.
- Tap Start Calibration. On a Bike+ the button says Start with resistance data.
- Pedal at an easy pace. After about two seconds the knob starts to turn.
- Stop pedaling once the knob is moving. Watch it work through the stages described below.
- When Calibration saved appears, answer the question and tap Yes, done or Done.
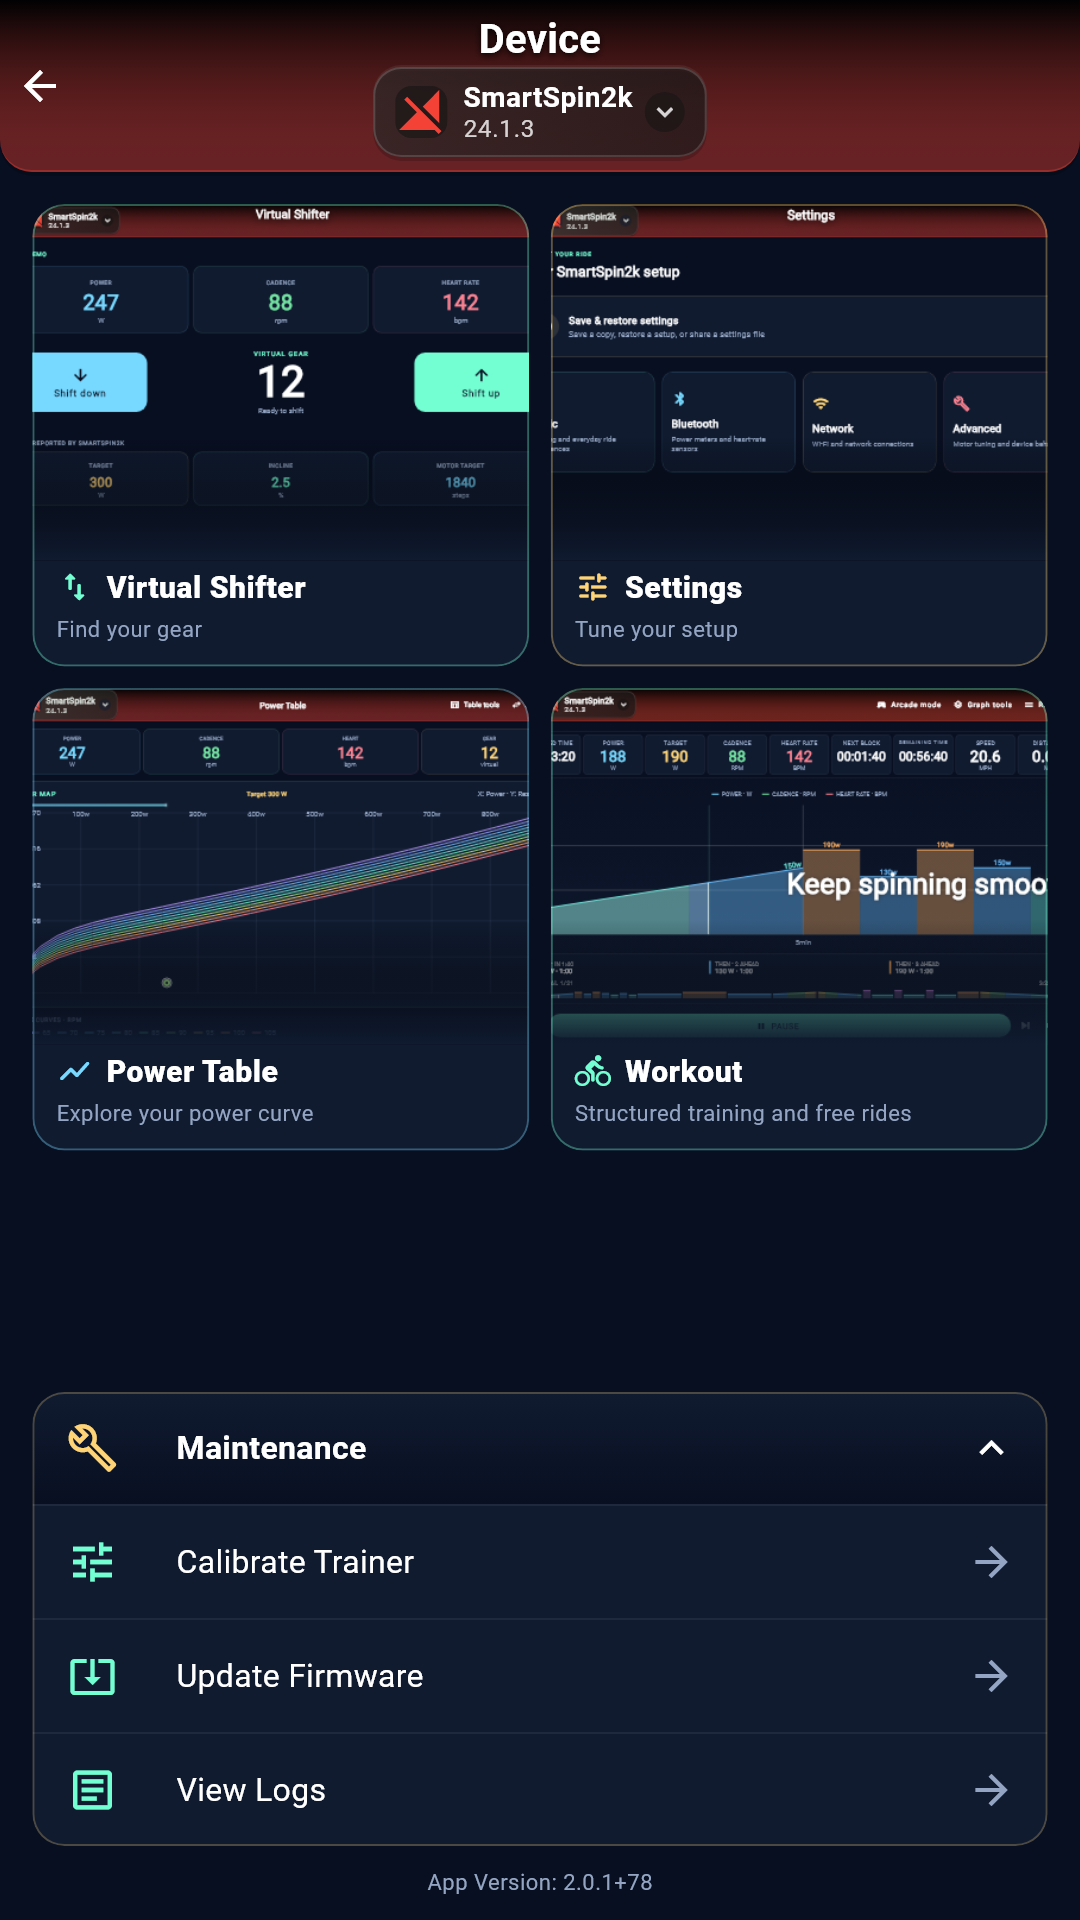
Maintenance Calibrate Trainer You can leave the screen while calibration runs. It keeps going on the SmartSpin2k. During a workout in the Companion App, it’s in the workout menu under Trainer setup.
-
Your training app’s Calibrate or Spin Down button runs the same calibration. SmartSpin2k picks the right method for your bike on its own.
- Pair SmartSpin2k as your controllable trainer. See pairing steps.
- Find Calibrate or Spin Down for the trainer, usually on the pairing or device screen.
- Start it and pedal at an easy pace. After about two seconds the knob starts to turn.
- Stop pedaling once the knob is moving. Partway through, the app may tell you to stop pedaling. That’s expected.
- Wait for the app to say calibration finished or failed.
Training apps show none of the detail below. Watch the knob instead. If it fails, run it from the Companion App to see why.
What SmartSpin2k is doing
The steps depend on your bike. Most bikes have a knob that stops at each end. The Peloton Bike+ knob turns forever, so SmartSpin2k uses the resistance Grupetto reports instead.
-
Spin bikes such as the Schwinn IC4 and Bowflex C6, bikes with a power meter, and the original Peloton Bike. The whole run usually takes a minute or two.
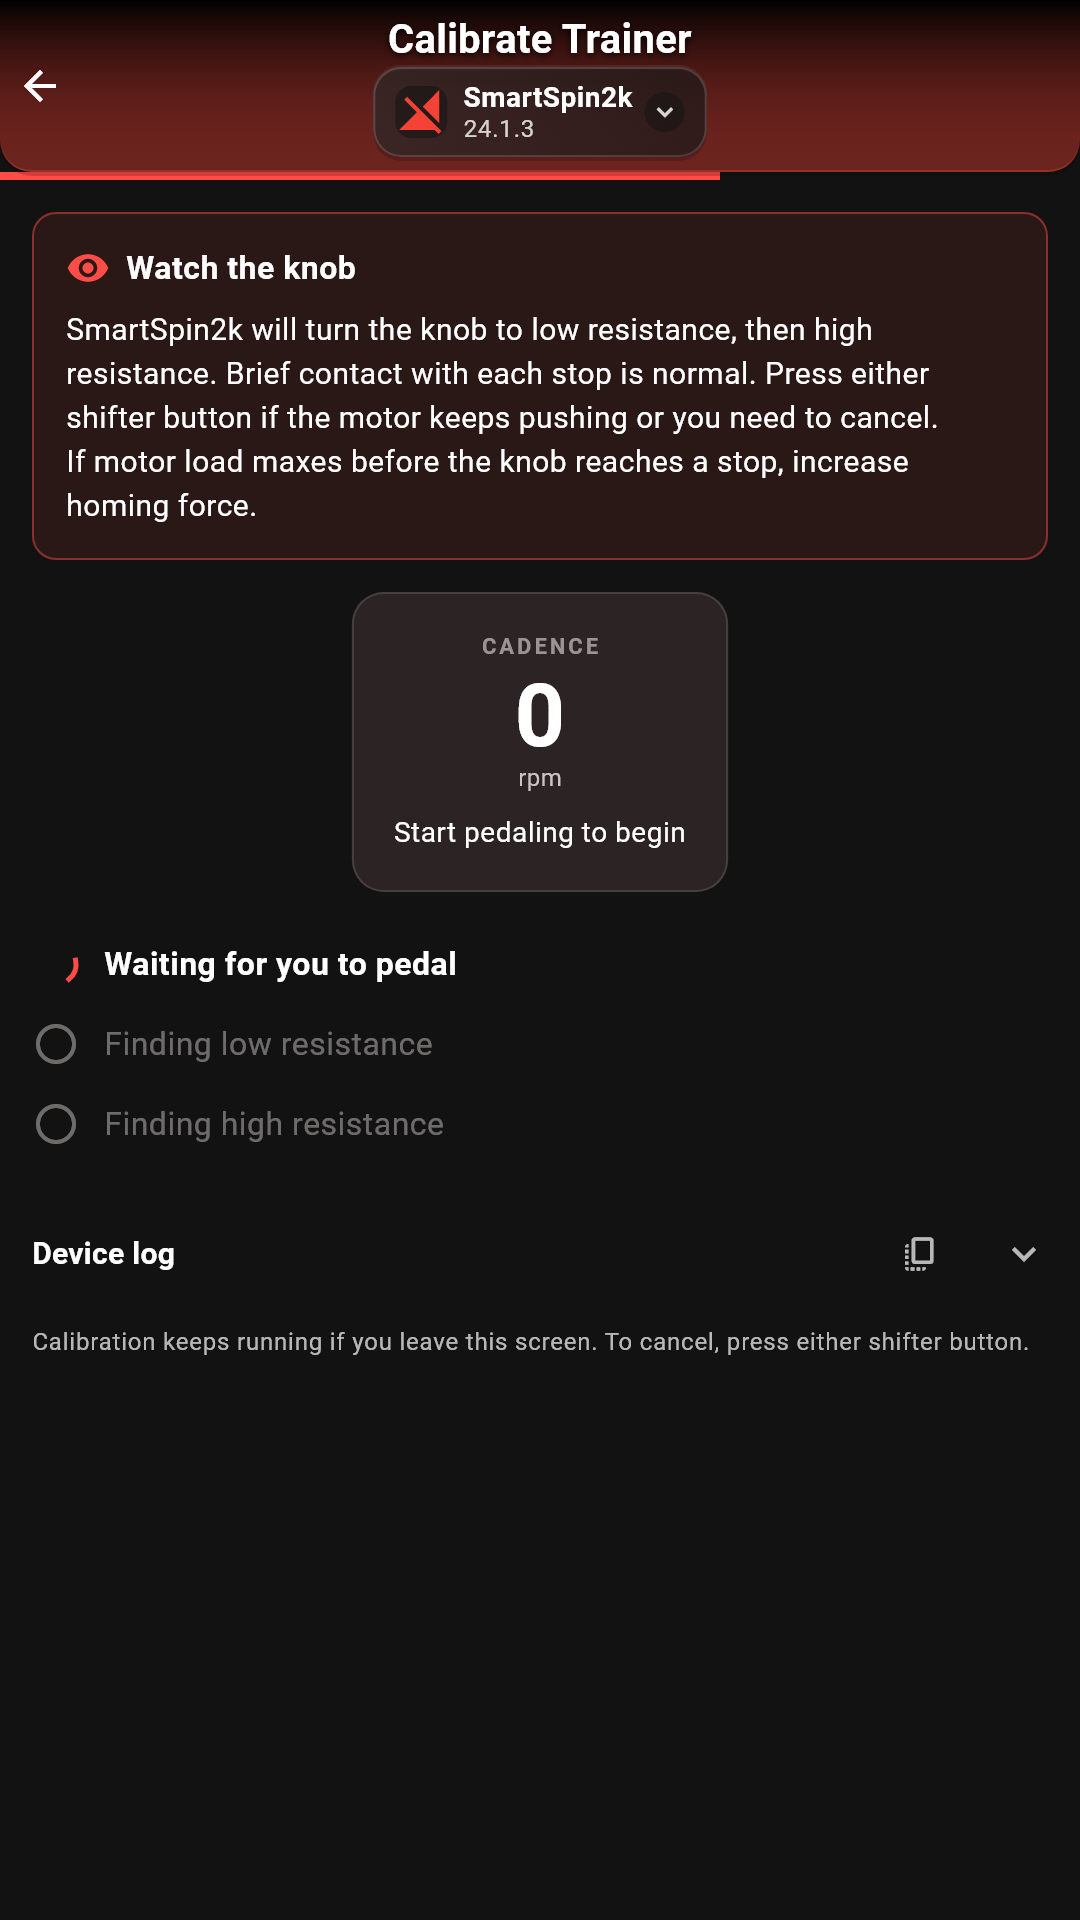 1Waiting for you to pedal
SmartSpin2k waits for about two seconds of pedaling above 10 rpm. That’s how it knows someone is on the bike. It reads cadence from your bike or power meter. Once the knob starts turning, you can stop pedaling.
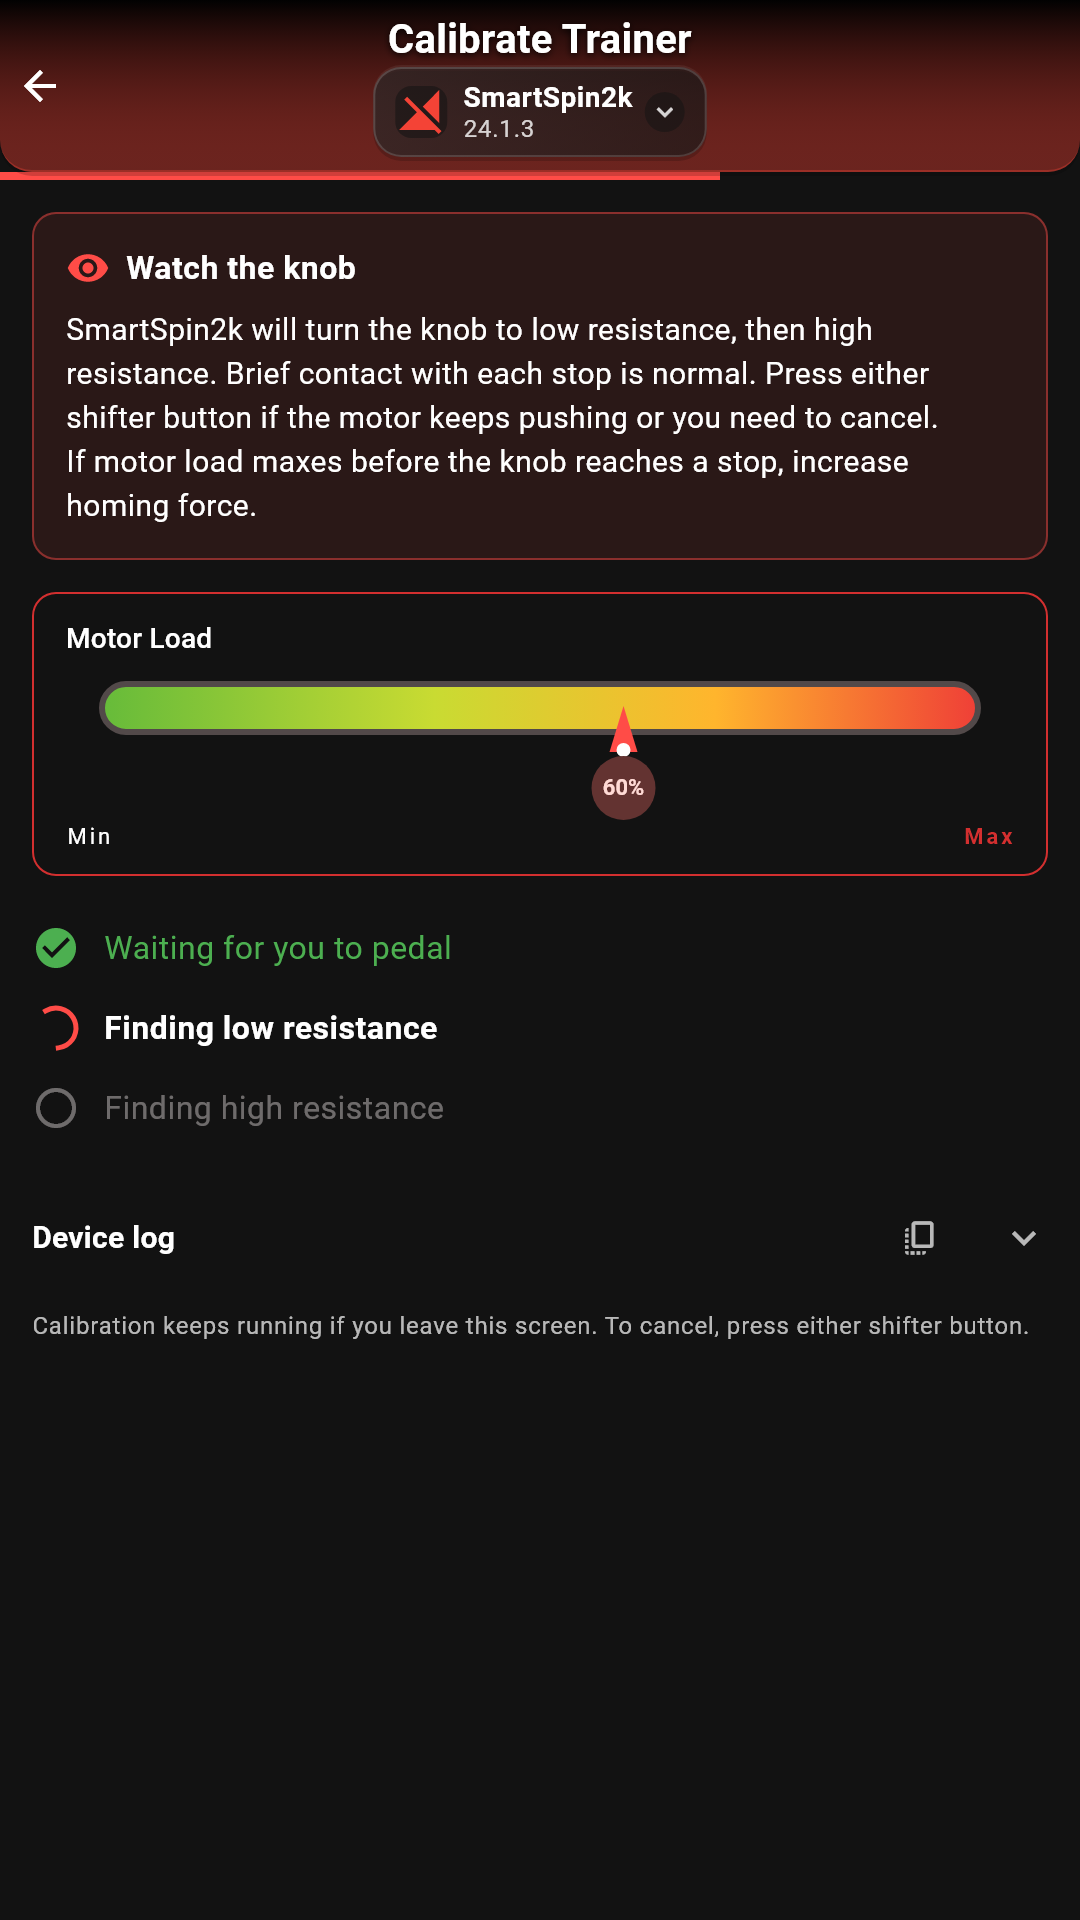 2Finding low resistance
The motor turns the knob toward low resistance at reduced power. The Motor Load gauge shows how hard the motor is working. When the knob reaches the stop, the load jumps and SmartSpin2k marks the spot.
It then backs off and taps the stop again, until several taps land in the same place. You’ll hear a few soft bumps. That’s normal. It sets its zero just above the stop.
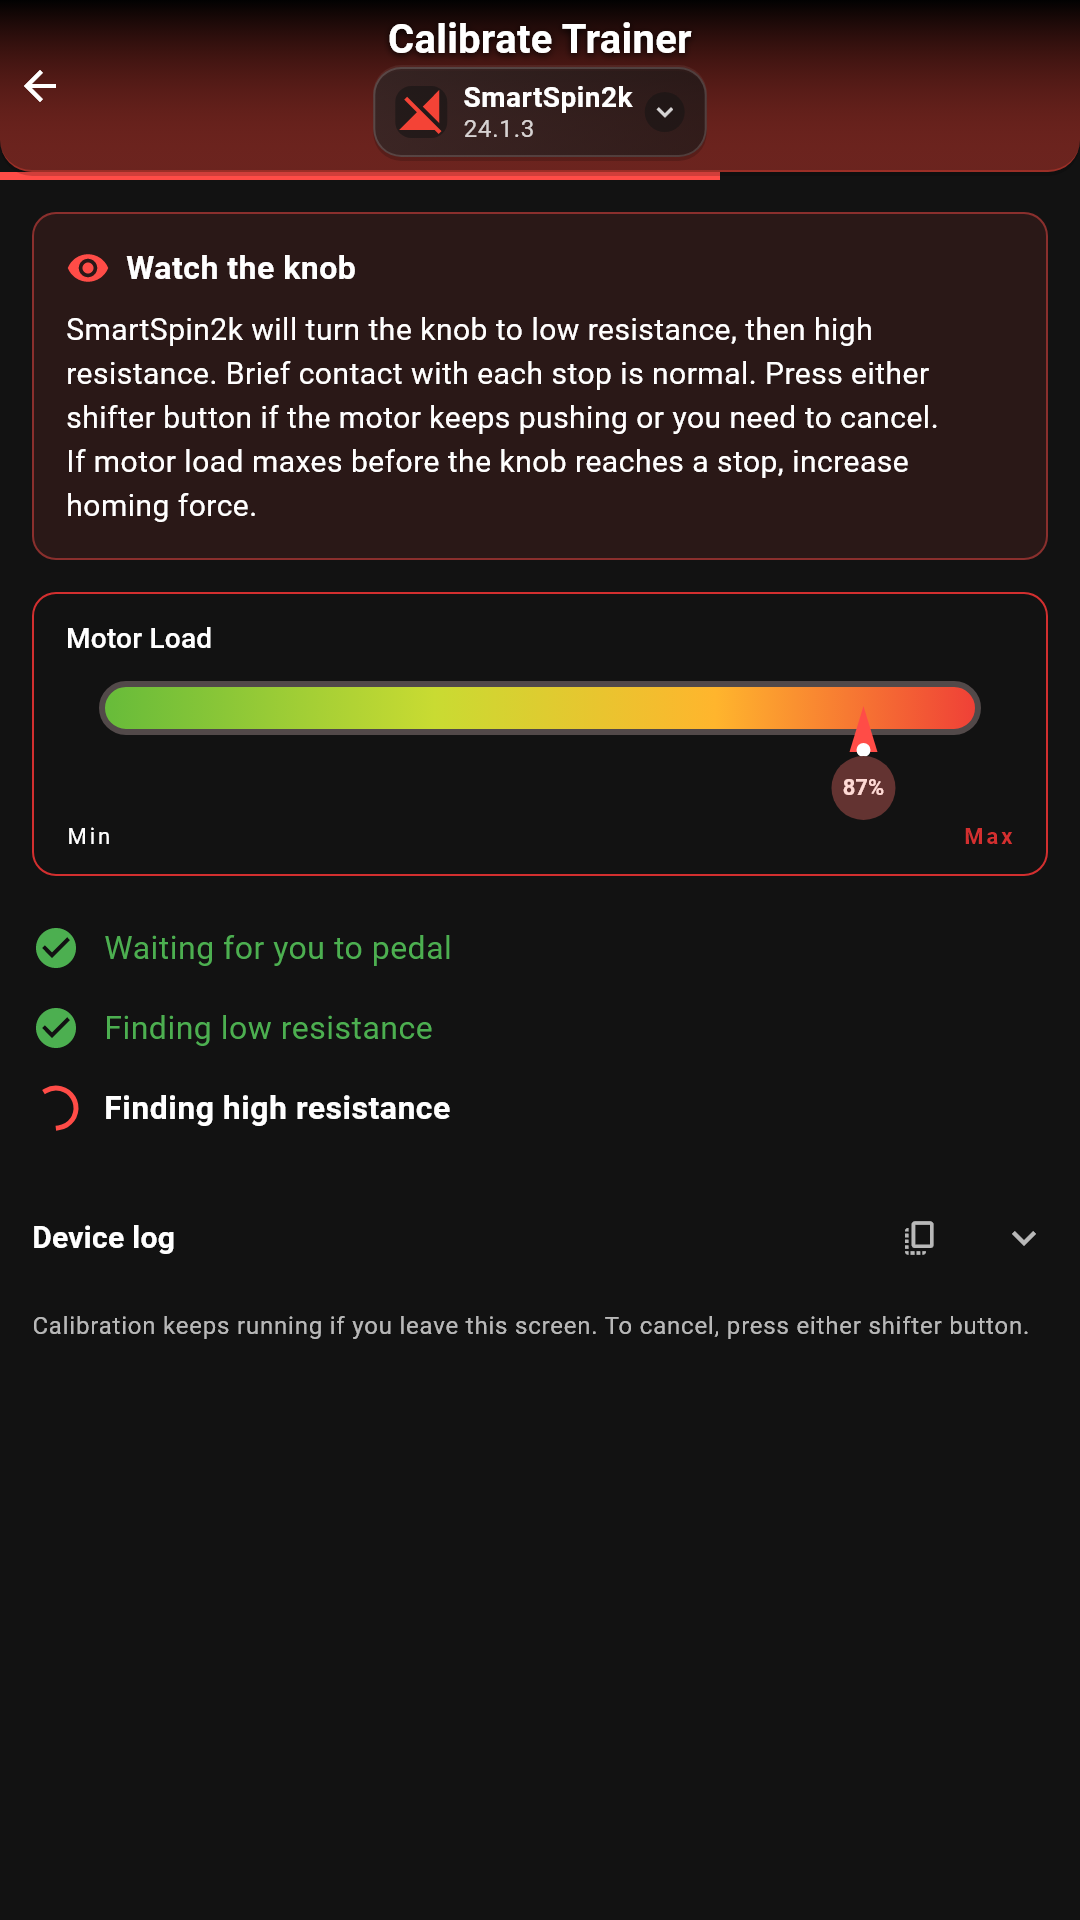 3Finding high resistance
Same again in the other direction: the knob turns up to the high-resistance stop and taps it until it gets a consistent reading. SmartSpin2k keeps a small margin below the stop, so the motor never pushes against it during a ride.
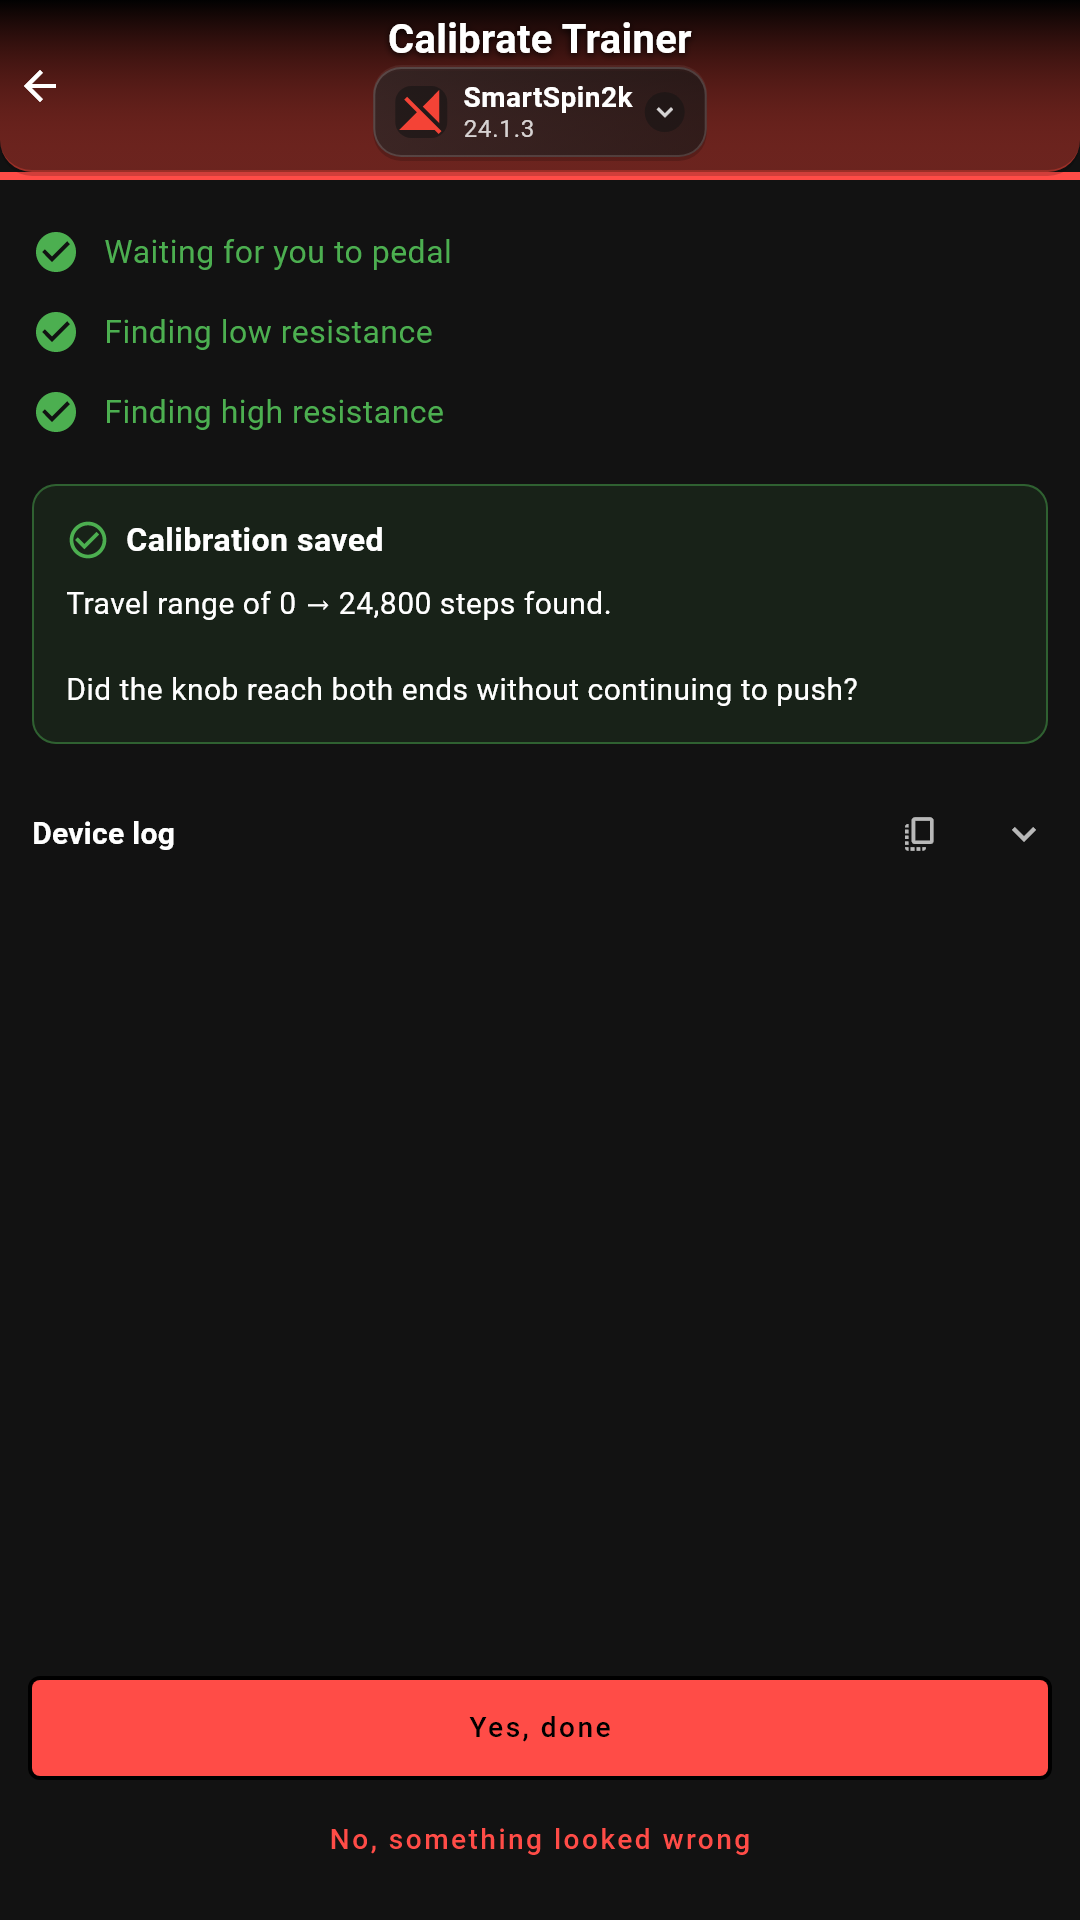 4Calibration saved
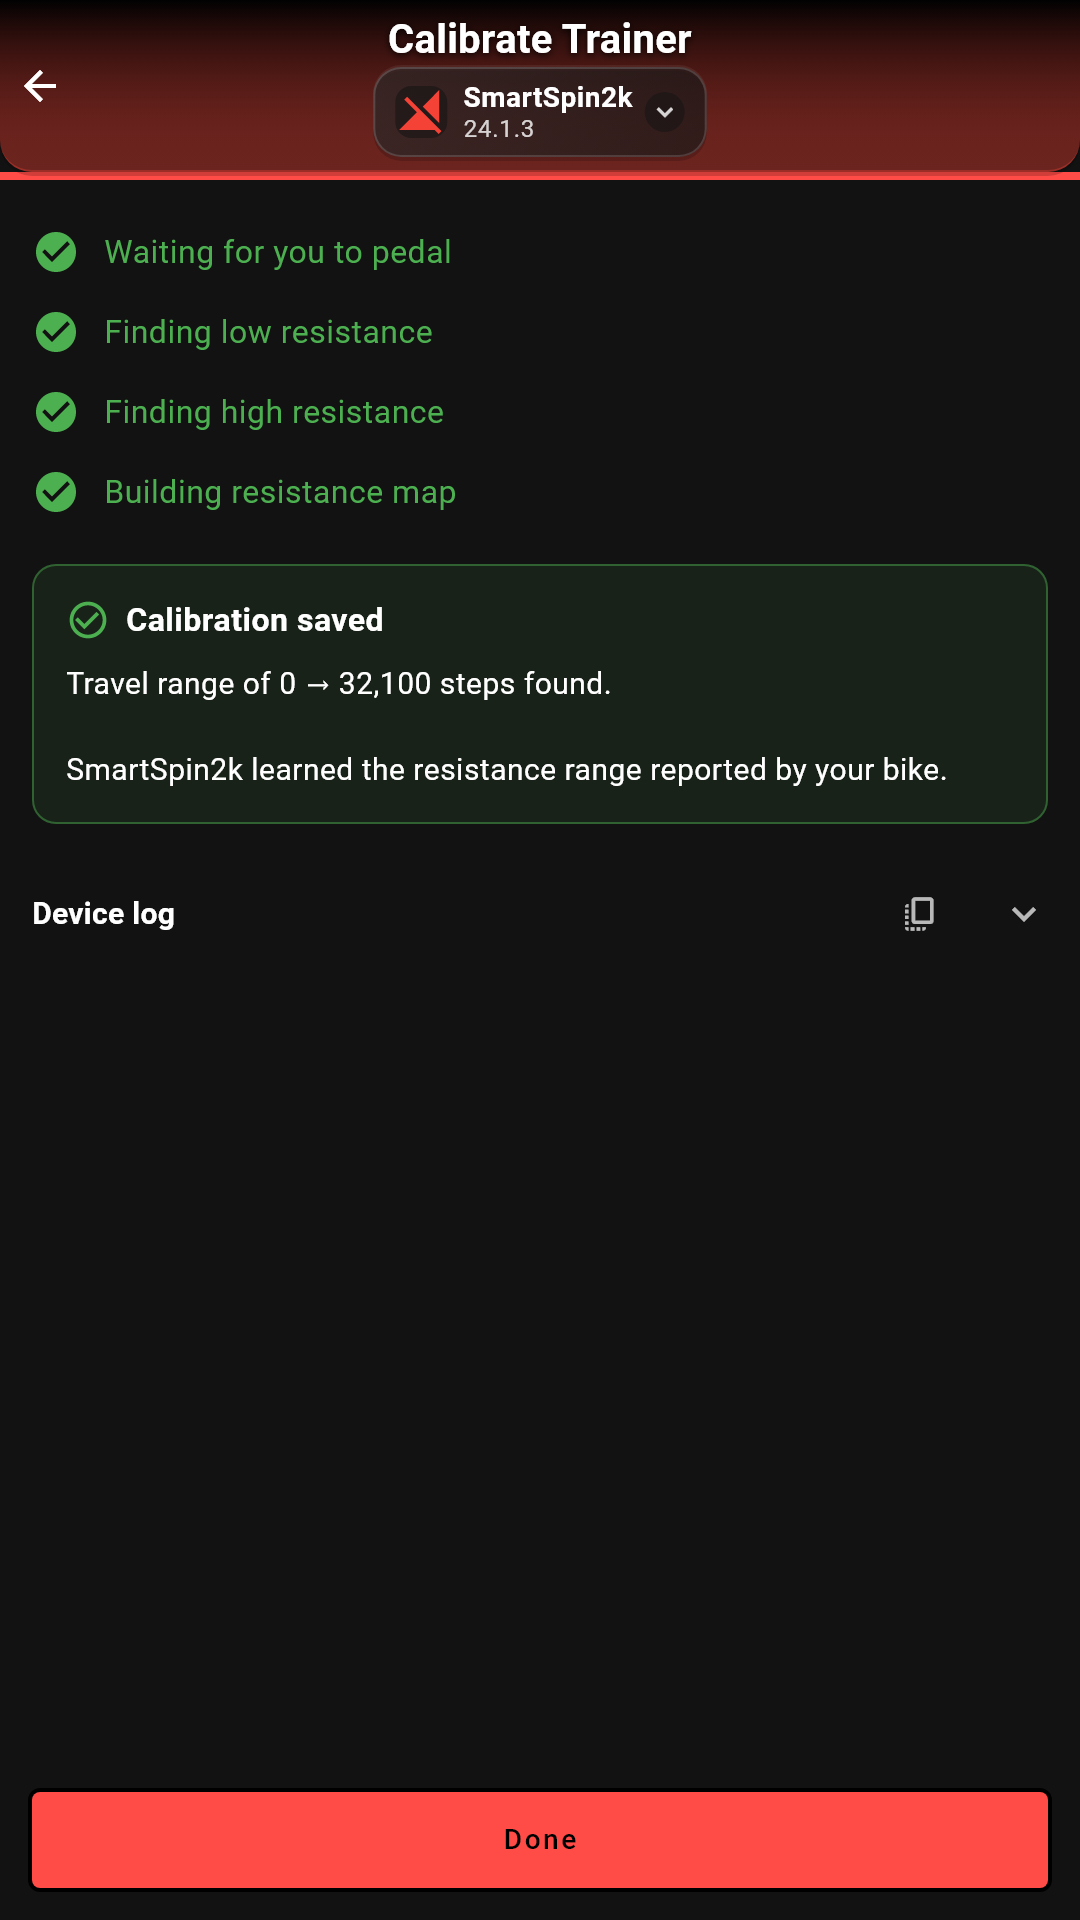
SmartSpin2k saves the range, shown in motor steps, and returns the knob to low resistance.
The app asks Did the knob reach both ends without continuing to push? If it did, tap Yes, done. If the motor kept grinding at a stop, or the knob stopped before the bike’s real limit, tap No, something looked wrong. See Adjust Homing Force.
-
The Bike+ knob has no stops to find. SmartSpin2k turns the knob and watches the 0–100 resistance that Grupetto reports from the bike. It’s slower than finding stops. Allow 3–5 minutes. Pauses and small reversals are normal.
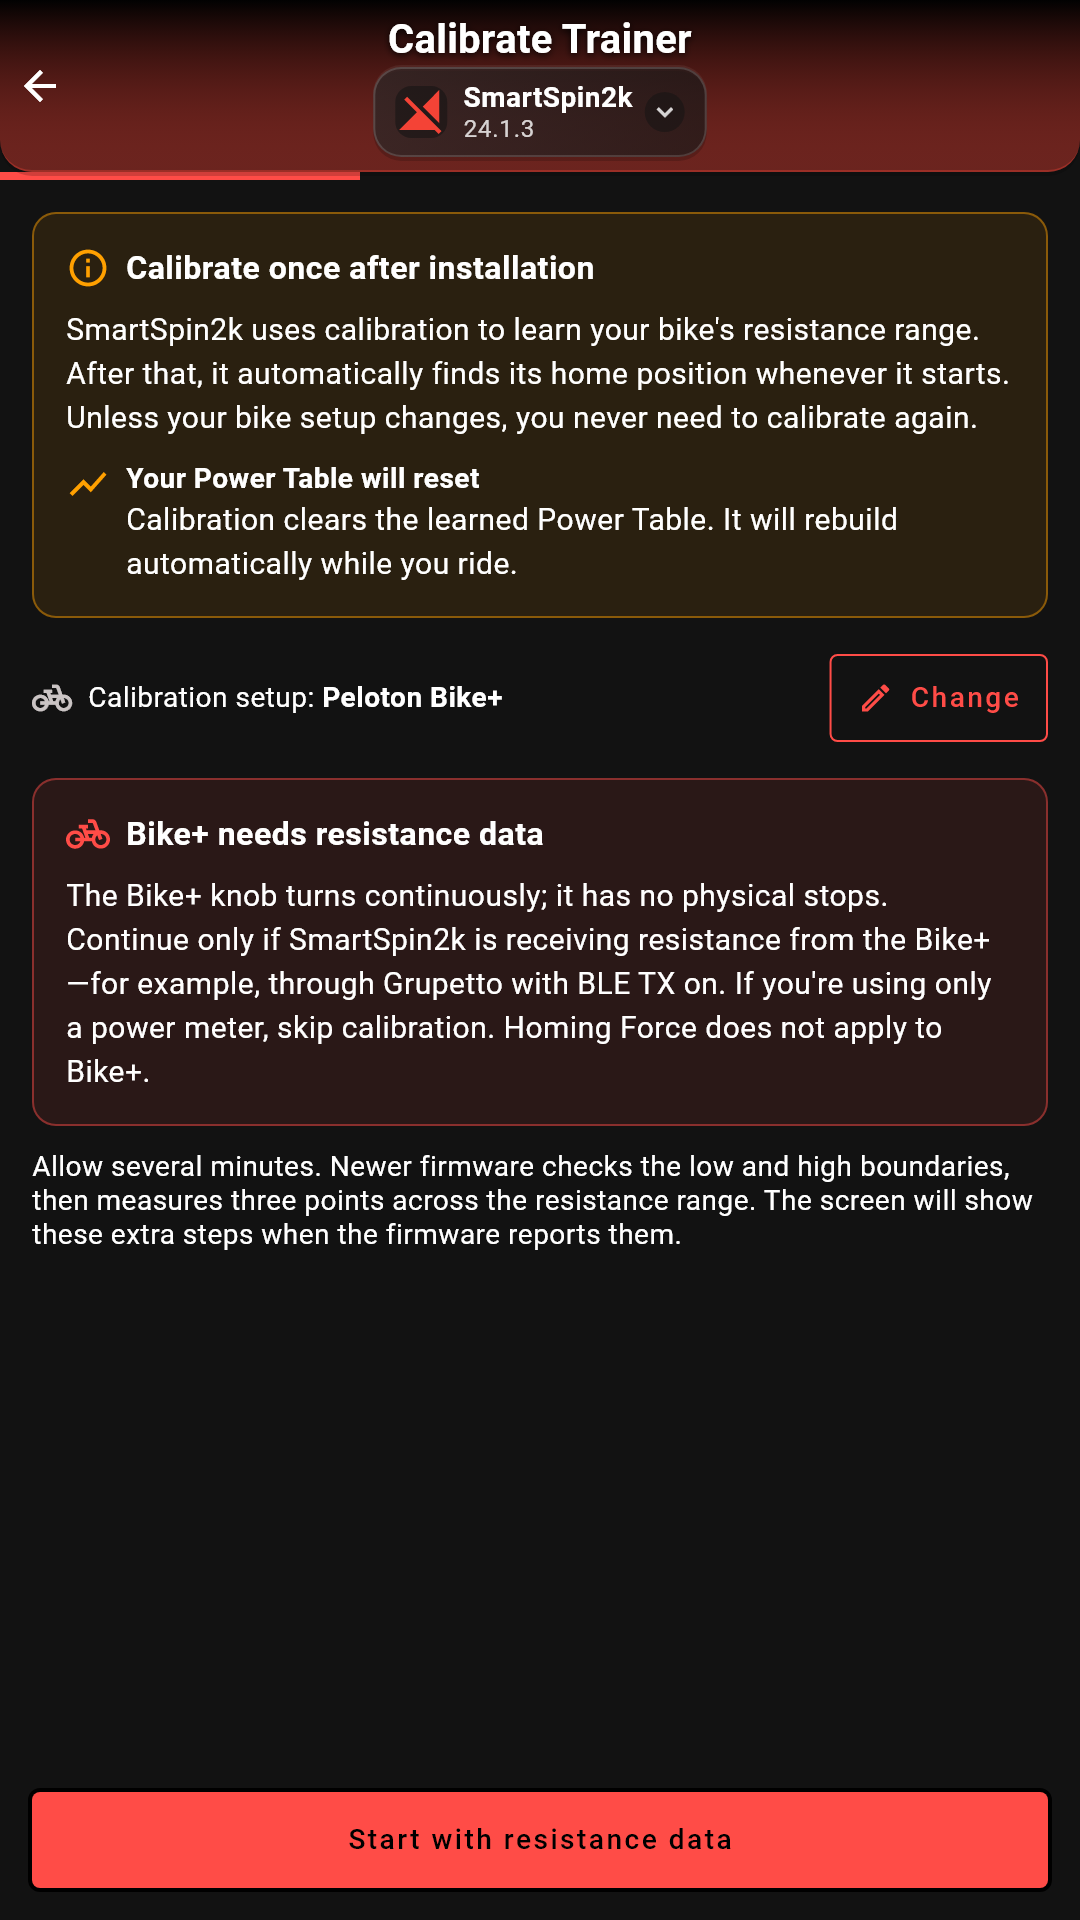 1Start and pedal
Tap Start with resistance data, then pedal for about two seconds with Grupetto open and BLE TX on. Once the knob starts turning, you can stop pedaling.
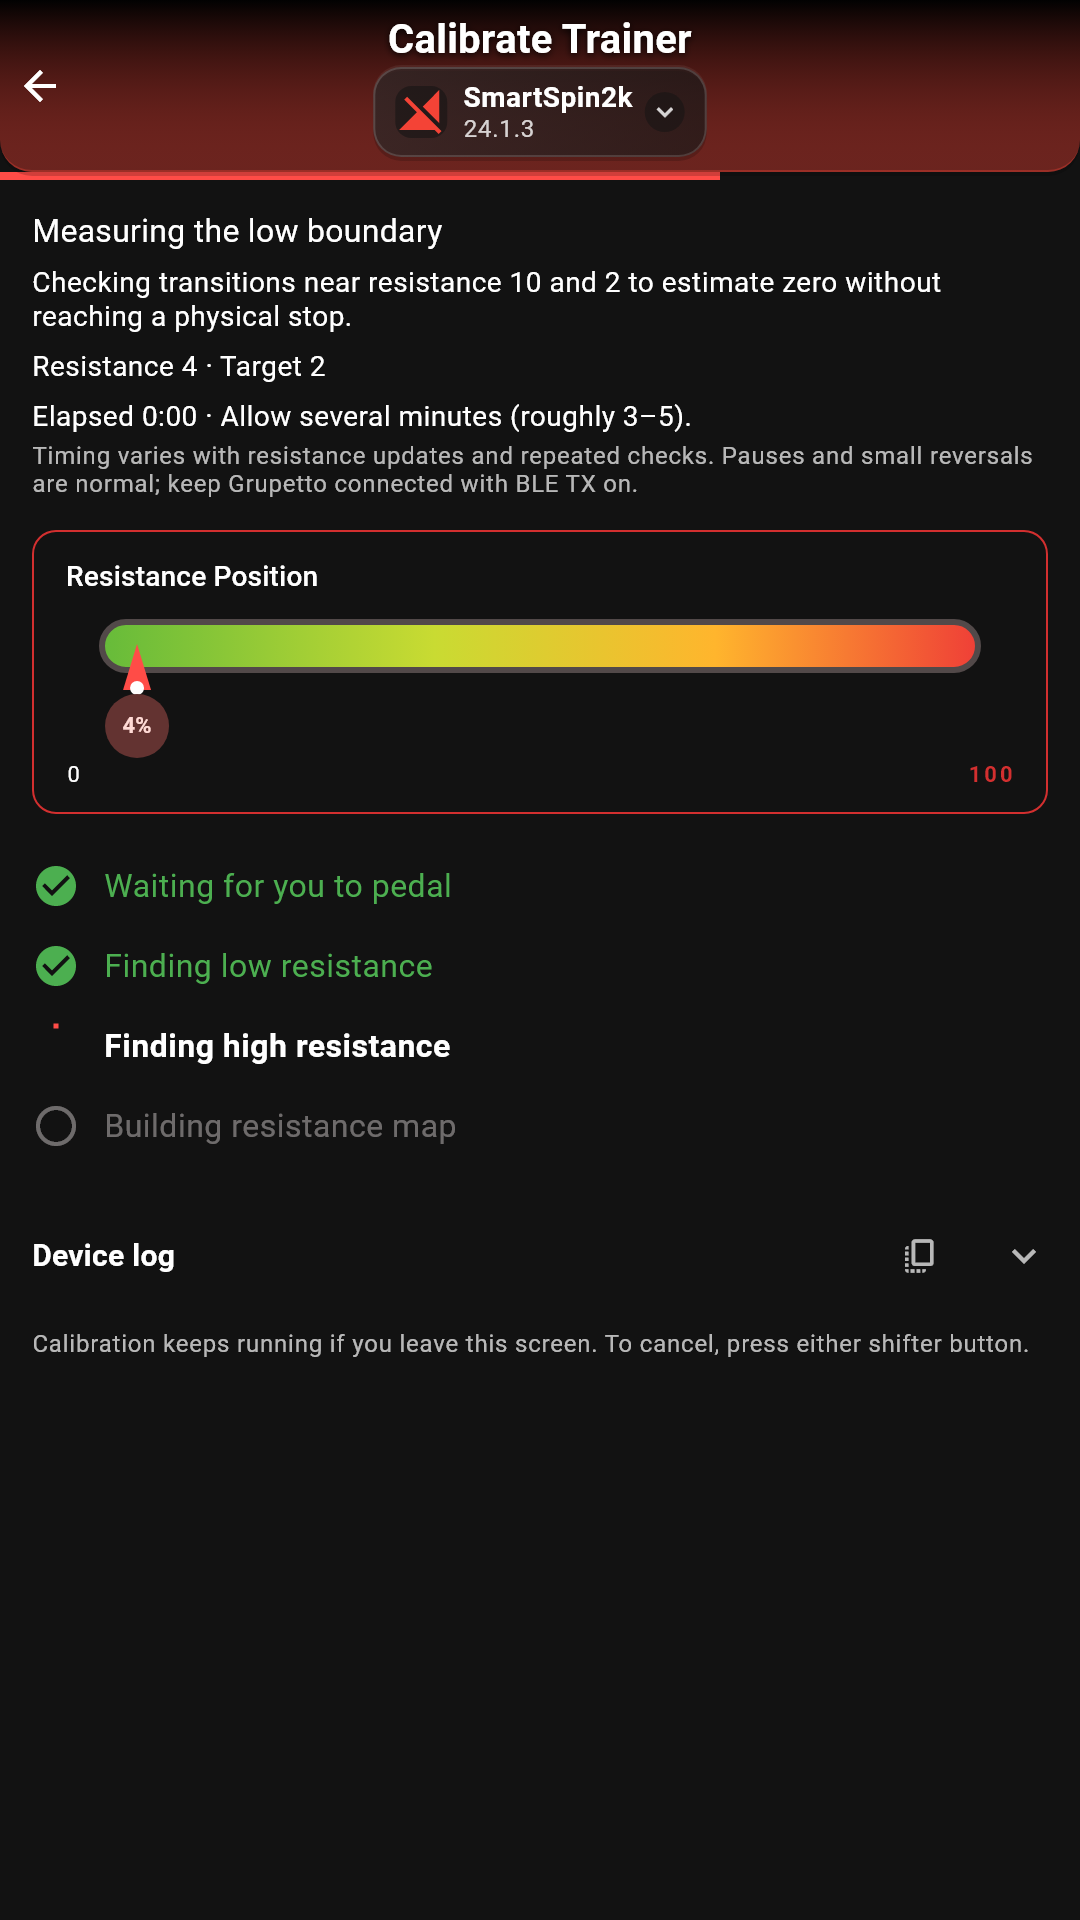 2Measuring the low boundary
SmartSpin2k turns the knob down and notes where the resistance changes near 10 and near 2. From those two points it works out where zero would be, without needing a stop.
3Measuring the high boundaryIt does the same near the top, at 90 and 98, to work out the upper limit.
 4Building the resistance map
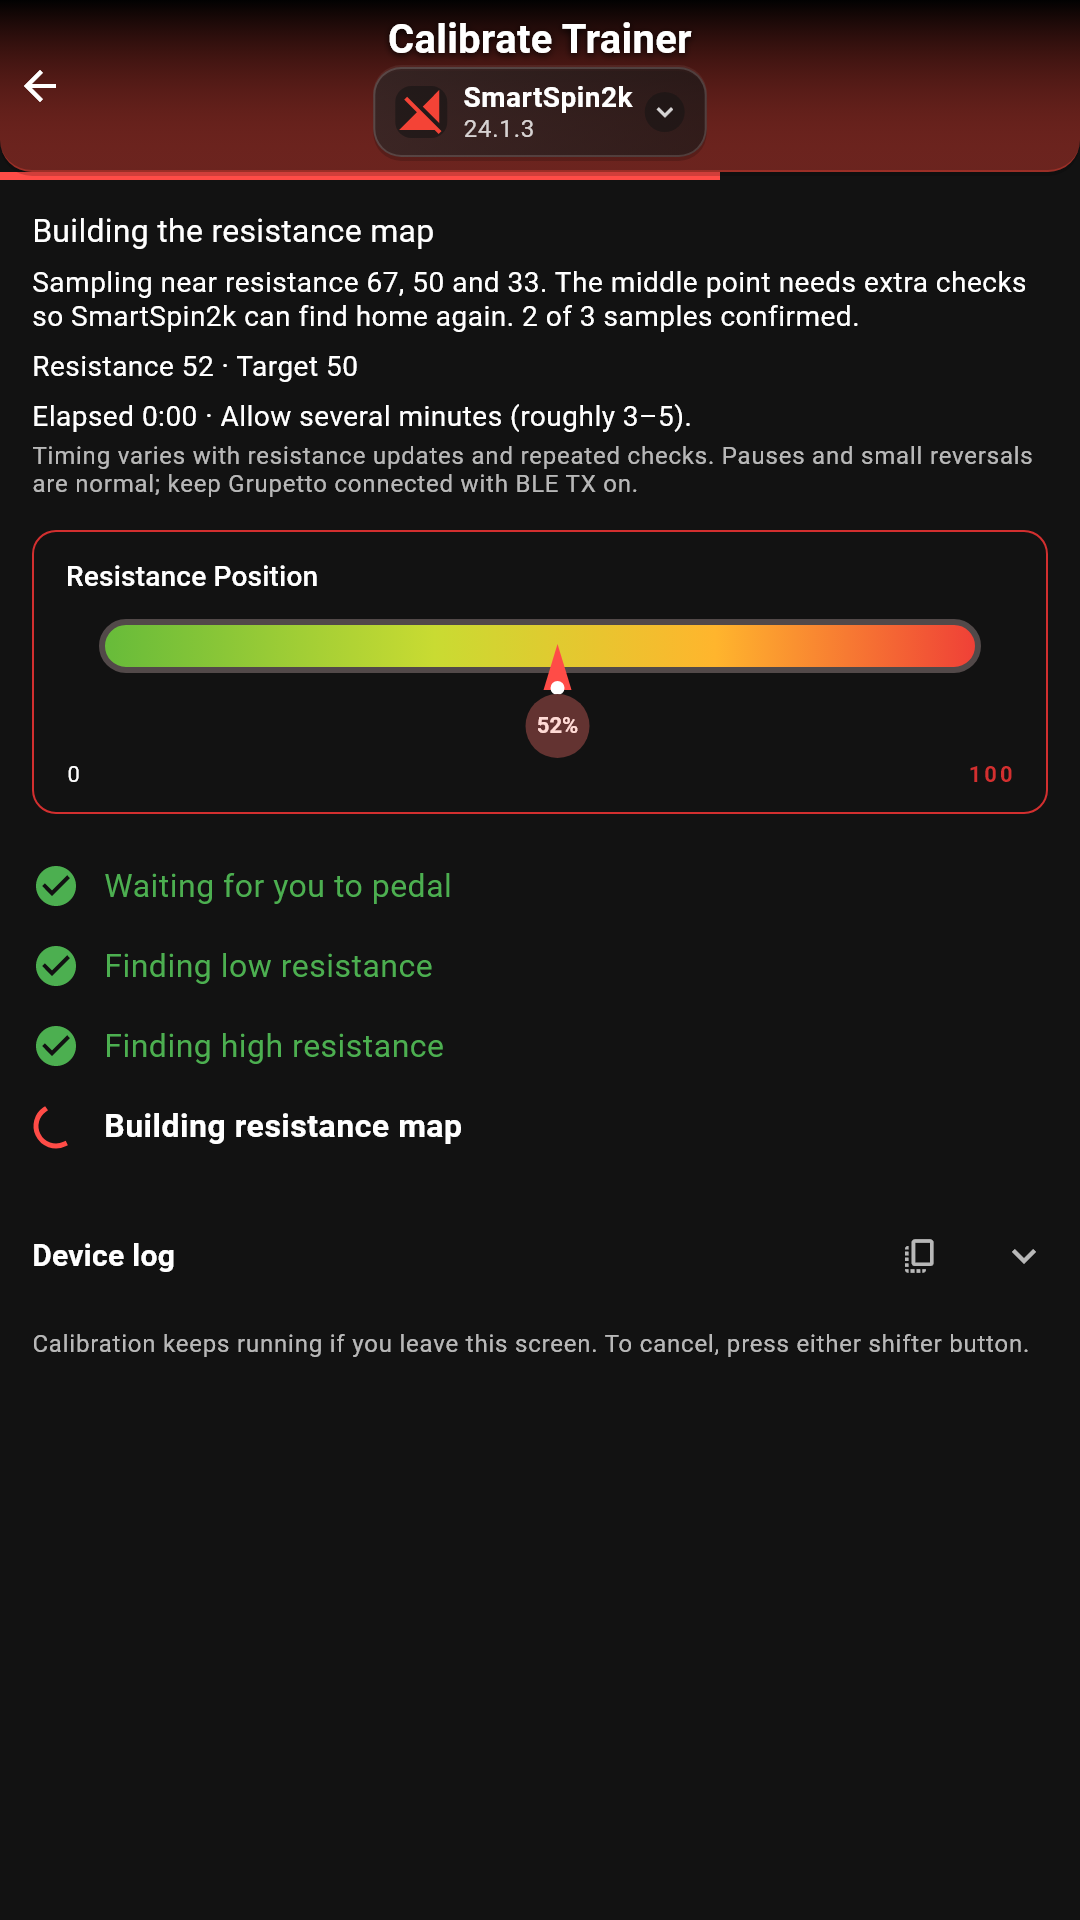
SmartSpin2k measures three points across the range, near resistance 67, 50, and 33. It checks the middle point extra carefully, because that’s the point it finds again at the start of every ride.
 5Calibration saved
The range and the map are saved. Tap Done.
Homing Force does not apply on the Bike+. If calibration stops with a message about resistance data, check that Grupetto is open, BLE TX is on, and Grupetto FTMS is your Saved Power Meter.
Every ride after calibration
Once calibrated, SmartSpin2k finds its starting point every time it powers on. This is called homing. It’s a short version of calibration, and it starts the first time you pedal.
- Knob with end stops: the knob turns down to the low stop, taps it until the reading is consistent, then moves to your starting gear. It doesn’t visit the high stop. It uses the saved range.
- Peloton Bike+ with Grupetto: the knob turns a little above resistance 50, then comes back down slowly until Grupetto reports the change from 51 to 50. No stops are involved. Keep Grupetto open with BLE TX on.
- Peloton Bike in Tablet Mode: start a Just Ride on the tablet so the bike sends cadence.
Don’t shift while the knob is homing. A shift cancels it, and SmartSpin2k rides that session on its default limits. It tries again the next time it powers on.
When to calibrate again
You don’t need to calibrate before each ride. Run it again when:
- You moved, remounted, or adjusted the SmartSpin2k, the arm, or the knob insert.
- You moved the SmartSpin2k to a different bike.
- You changed Homing Force.
- The knob stops short of the bike’s real low or high end, or pushes against a stop during rides.
- Homing at power-on keeps failing.
Peloton Bike+: if you change your Saved Power Meter, SmartSpin2k notices. It runs the full calibration on its own the next time it powers on and you pedal. Allow 3–5 minutes.
Stop or fix a calibration
Cancel
Press either shifter button. SmartSpin2k stops the motor and saves nothing.
Adjust Homing Force
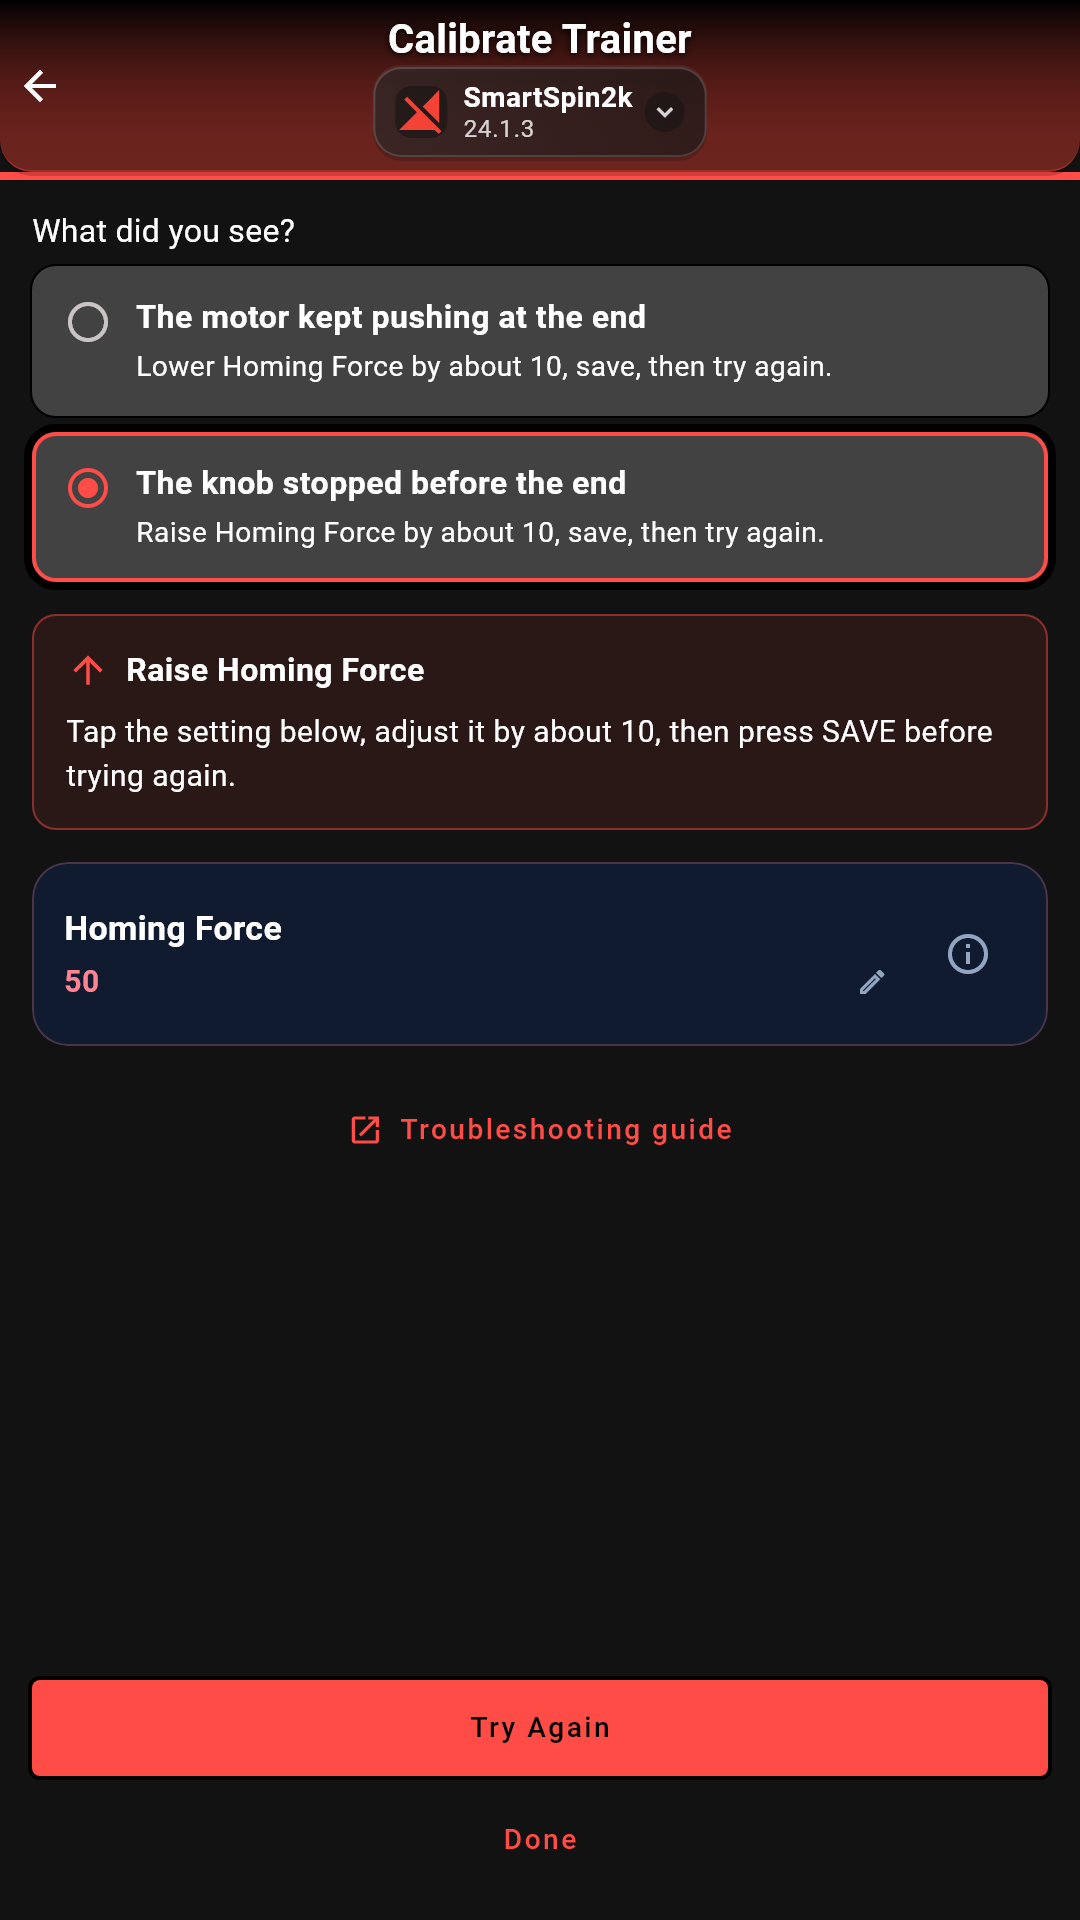
Homing Force sets how much motor load counts as “reached the stop”. The default is 50. In the Companion App, tap No, something looked wrong after a run, or Change next to Homing Force on the first calibration screen.
| What you saw | What to do |
|---|---|
| The motor kept pushing at the end | Lower Homing Force by about 10, save, then try again. |
| The knob stopped before the end | Raise Homing Force by about 10, save, then try again. |
Other messages
- The SmartSpin2k never started homing: it didn’t see steady pedaling. Check that cadence shows in the Companion App, then try again.
- Calibration was aborted: the shifter moved. Leave it alone and try again.
- Calibration data stopped arriving: turn the SmartSpin2k off and on, then try again.
For anything else, open Device log on the calibration screen and tap the copy button. It copies the whole run. Paste it into your support request. See Troubleshooting.
Turn calibration off
To remove a saved calibration, on the Device screen tap Power Table, then Table tools, then Clear Active Table. This deletes the learned Power Table and the saved range. SmartSpin2k goes back to riding without calibration.